Quick Start
Welcome to FlexKVM! FlexKVM is a remote device management tool that connects to your computer (referred to as the target host) via USB and HDMI, allowing you to control it remotely through a browser over the network.
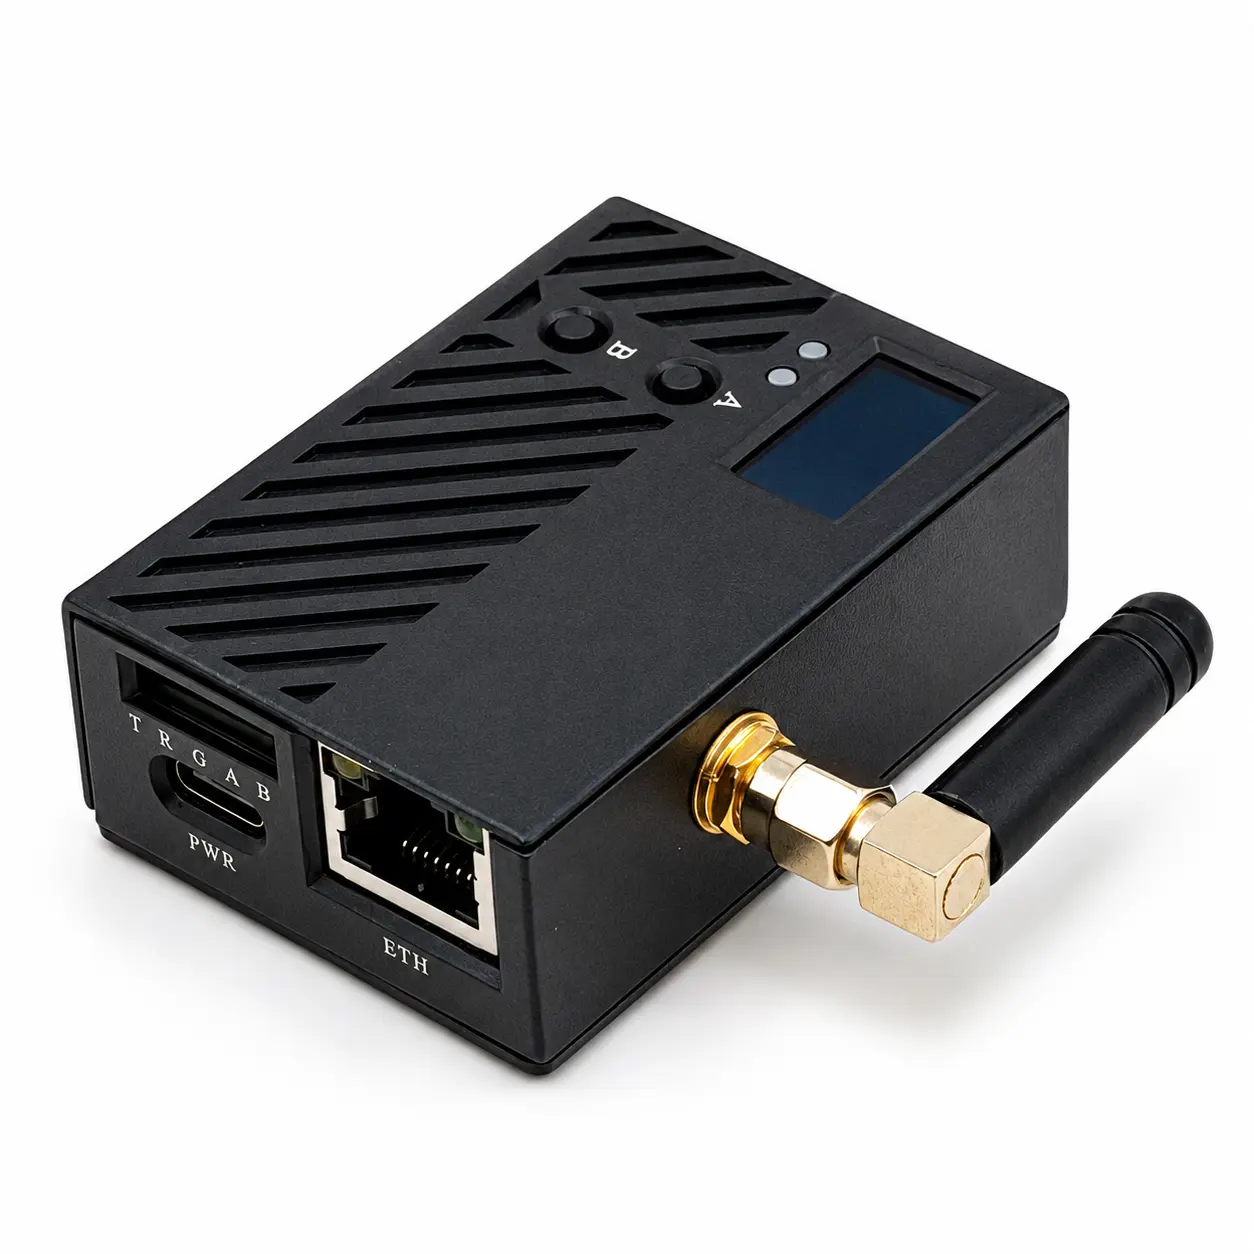
Terminology
| Term | Definition |
|---|---|
| FlexKVM | Short for FlexKVM device, used throughout this documentation |
| Target host | The device being managed remotely, such as a computer or server |
| Control device | The device used to access and control FlexKVM |
Overview
Three steps to get started:
Before you begin: Verify the package contents, prepare the required items, and familiarize yourself with the interfaces.
| Step | Action | Success indicator |
|---|---|---|
| 1. Connect & power on | Connect power, USB, and HDMI | OLED shows device status, 🟢 status LED solid on |
| 2. Network setup | Connect Ethernet or configure WiFi | OLED shows device IP address, 🔴 warning LED off |
| 3. Access device | Open device IP in browser, create an account | Browser shows FlexKVM main interface |
The whole process takes about 5–8 minutes.
Package Contents
Open the package and verify the following items:
| # | Item | Qty | Notes |
|---|---|---|---|
| [1] | FlexKVM device | 1 | Core device |
| [2] | HDMI cable | 1 | Connects to target host video output |
| [3] | USB Type-C cable | 3 | Power, data, and ATX control. All three are identical and interchangeable, 1m length, Type-A to Type-C |
| [4] | ATX controller | 1 | For remote power control |
| [5] | ATX Dupont wires | 10 | ATX controller wiring |
| [6] | Magnetic backplate | 1 | Mounts device on a rack |
| [7] | Quick start guide | 1 | Product usage guide |
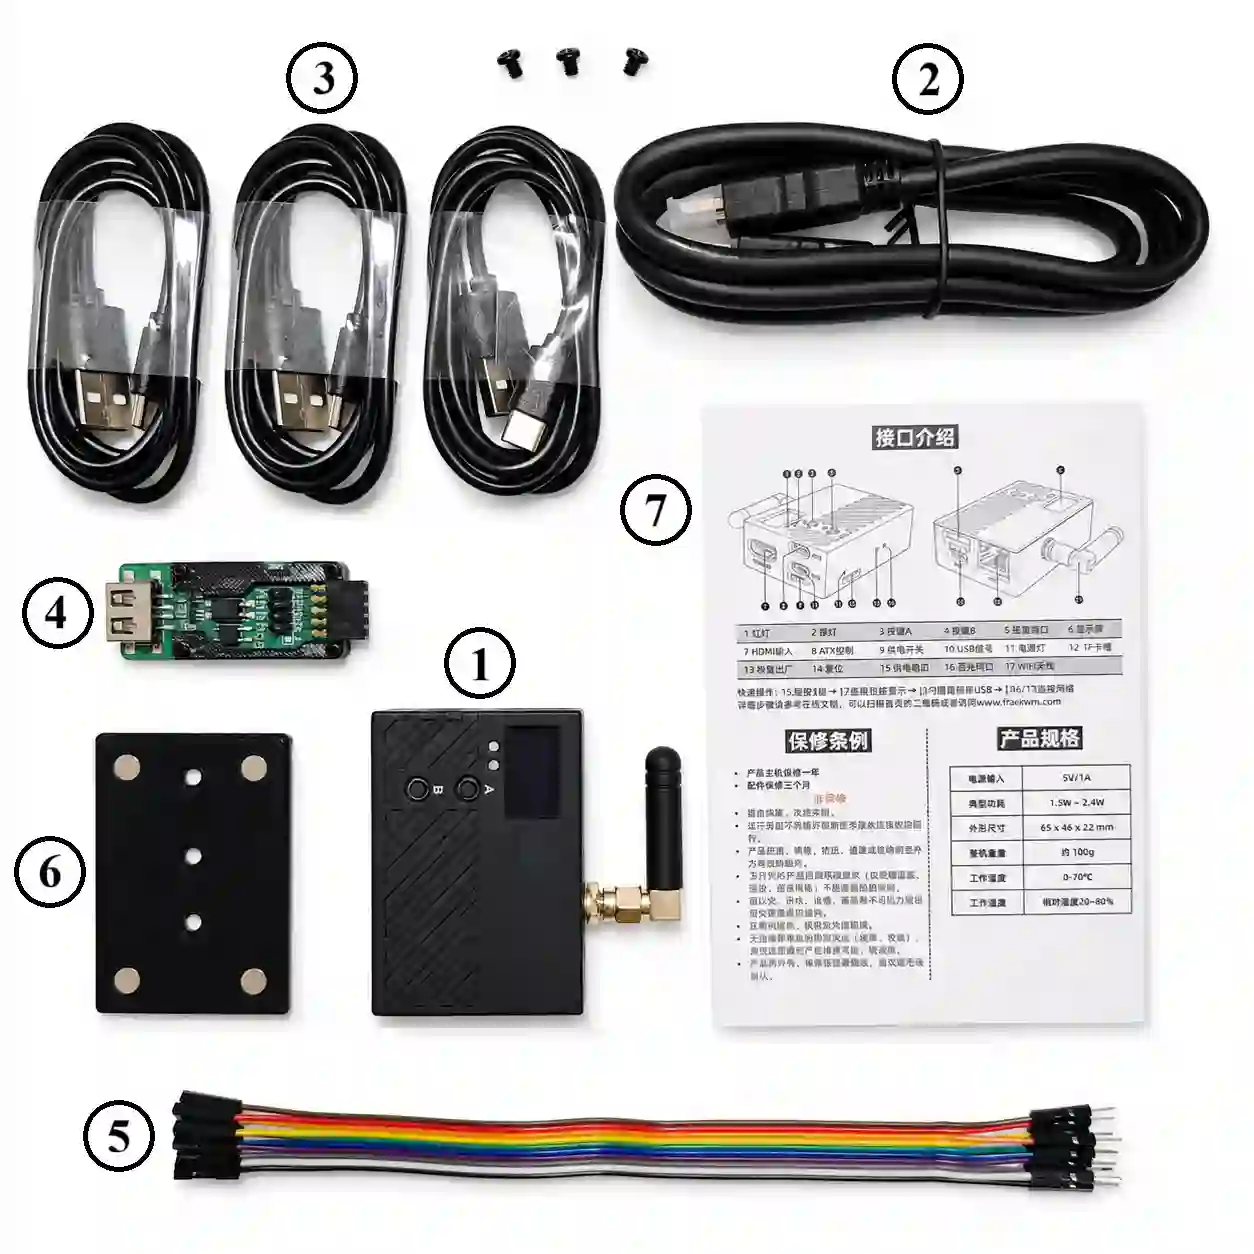
The magnetic backplate is pre-installed on the back of the device — just confirm it's there.
The ATX controller and Dupont wires are for remote power control and are not needed during quick start. See ATX Power Control for setup later.
Preparation
In addition to the included items, you'll need to provide:
| Item | Purpose | Notes |
|---|---|---|
| USB power adapter (5V/1A or higher) | Independent power supply | Recommended for best stability |
| Ethernet cable | Wired network | Not needed if using hotspot provisioning |
| Powered-on target host (PC/server) | The device to be managed | Must have HDMI output and USB port |
| HDMI adapter | Adapt non-standard HDMI ports | Required if the target host uses Mini/Micro HDMI — you must provide your own adapter or converter cable |
| Control device (computer or phone with internet) | Configure device, remotely access | Windows / macOS / Linux supported. Chrome / Edge recommended |
No USB power adapter? You can power FlexKVM from the target host's USB port, but if the target host shuts down, FlexKVM loses power and remote power-on becomes impossible.
Chrome / Edge are recommended. Other browsers may have compatibility issues (e.g., display problems).
FlexKVM and your control device (computer/phone) must be on the same local network (connected to the same router) to communicate. Verify your network environment before proceeding.
Interface Overview
Here are the interfaces you'll use during quick start. Just know where they are and what they do.
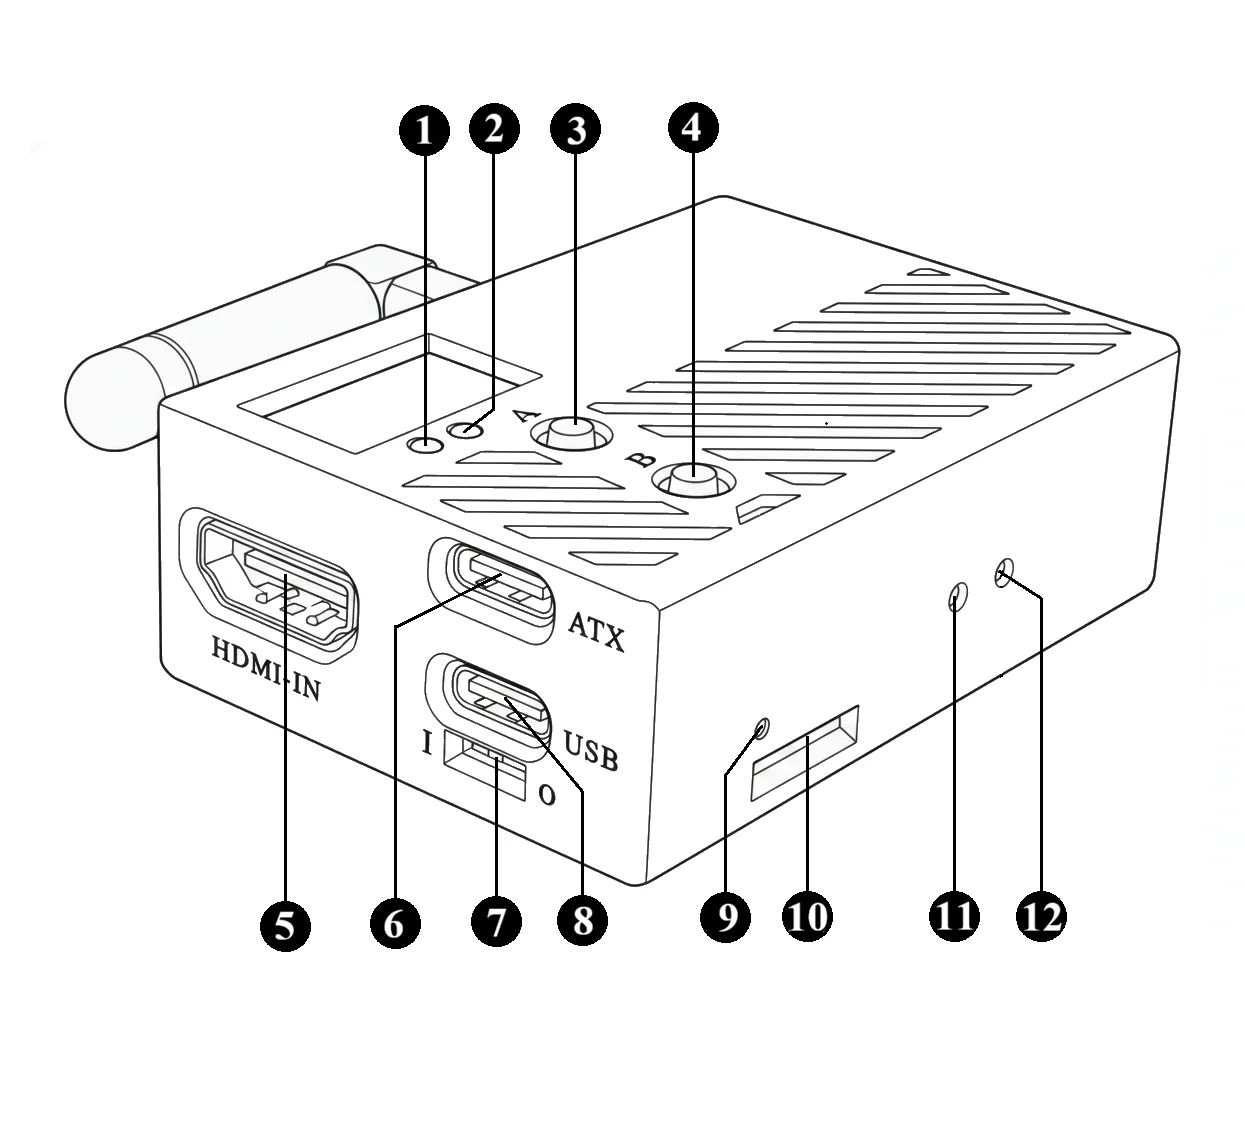
| # | Name | Description |
|---|---|---|
| [1] | 🔴 Warning LED | Reflects network and system status — see quick-reference table below |
| [2] | 🟢 Status LED | Reflects device connection status — the primary indicator of whether the device is working properly |
| [3] | Button A | Hold 1–3s to enter hotspot provisioning mode; hold >3s to return to home |
| [5] | HDMI input | Connect to target host's HDMI output |
| [7] | USB power switch | Controls whether USB port draws power from target host |
| [8] | USB port | Connect to target host for keyboard/mouse signals |
| [9] | 🔴 Power LED | On = powered, Off = not powered |
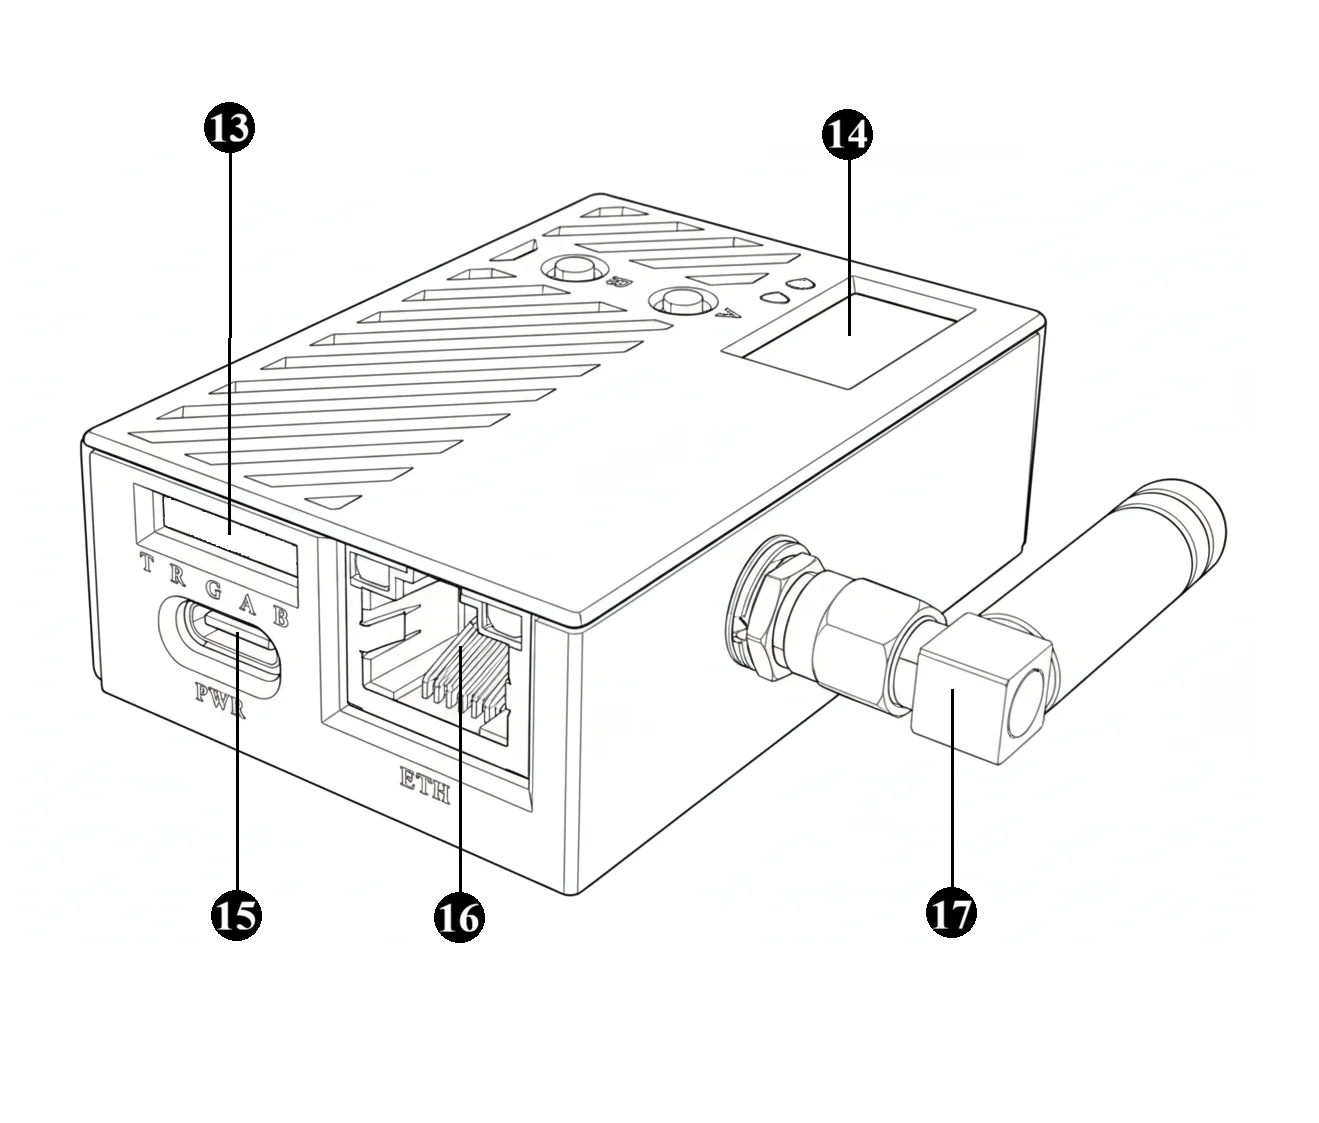
| # | Name | Description |
|---|---|---|
| [14] | OLED display | Shows device status, IP address, and provisioning info |
| [15] | Power port | Connect to 5V power adapter |
| [16] | Ethernet port | Connect to router or switch |
| [17] | WiFi antenna | Pre-installed at factory — no user action needed |
Numbers 4, 6, 10–13 (Button B, ATX control, TF card slot, factory reset, reset button) are not needed during quick start. See Interface Reference for details.
Status LED Quick Reference
🟢 Status LED reflects connection state:
| State | Frequency | Meaning |
|---|---|---|
| Off | — | System not started normally |
| Slow blink | 1/s | HDMI not connected or target host sleeping |
| Fast blink | 4/s | USB not connected or target host powered off |
| Solid on | — | HDMI and USB connected normally |
Priority: fast blink > slow blink > solid on. For example, if both USB and HDMI are disconnected, the LED shows fast blink; if USB is normal but HDMI is disconnected, it shows slow blink.
During connection, make sure the target host is powered on and working — a sleeping or powered-off host may prevent subsequent steps from completing.
For detailed LED information, see LED Indicator.
Warning LED Quick Reference
🔴 Warning LED reflects network and system status:
| State | Frequency | Meaning | What to do |
|---|---|---|---|
| Off | — | Network connected, everything normal | ✅ All good, no action needed |
| Slow blink | 1/s | Network not connected or in hotspot provisioning mode | ✅ Normal — will turn off after network is configured |
| Fast blink | 4/s | Urgent event (OTA upgrade, factory reset, etc.) | ⚠️ You won't see this during quick start |
| Solid on | — | Critical system error | ❌ Reboot the device; if it persists, contact support |
During quick start, you'll only see slow blink and off.
For detailed LED information, see LED Indicator.
Connect and Power On
Three connections to make:
The device takes about 20 seconds to boot after power-on. Wait for the OLED to light up before proceeding.
- Connect power
- Connect USB
- Connect HDMI
Connect Power
Take one USB Type-C cable (package item [3]) and connect FlexKVM's power port [15] to a 5V/1A power adapter.
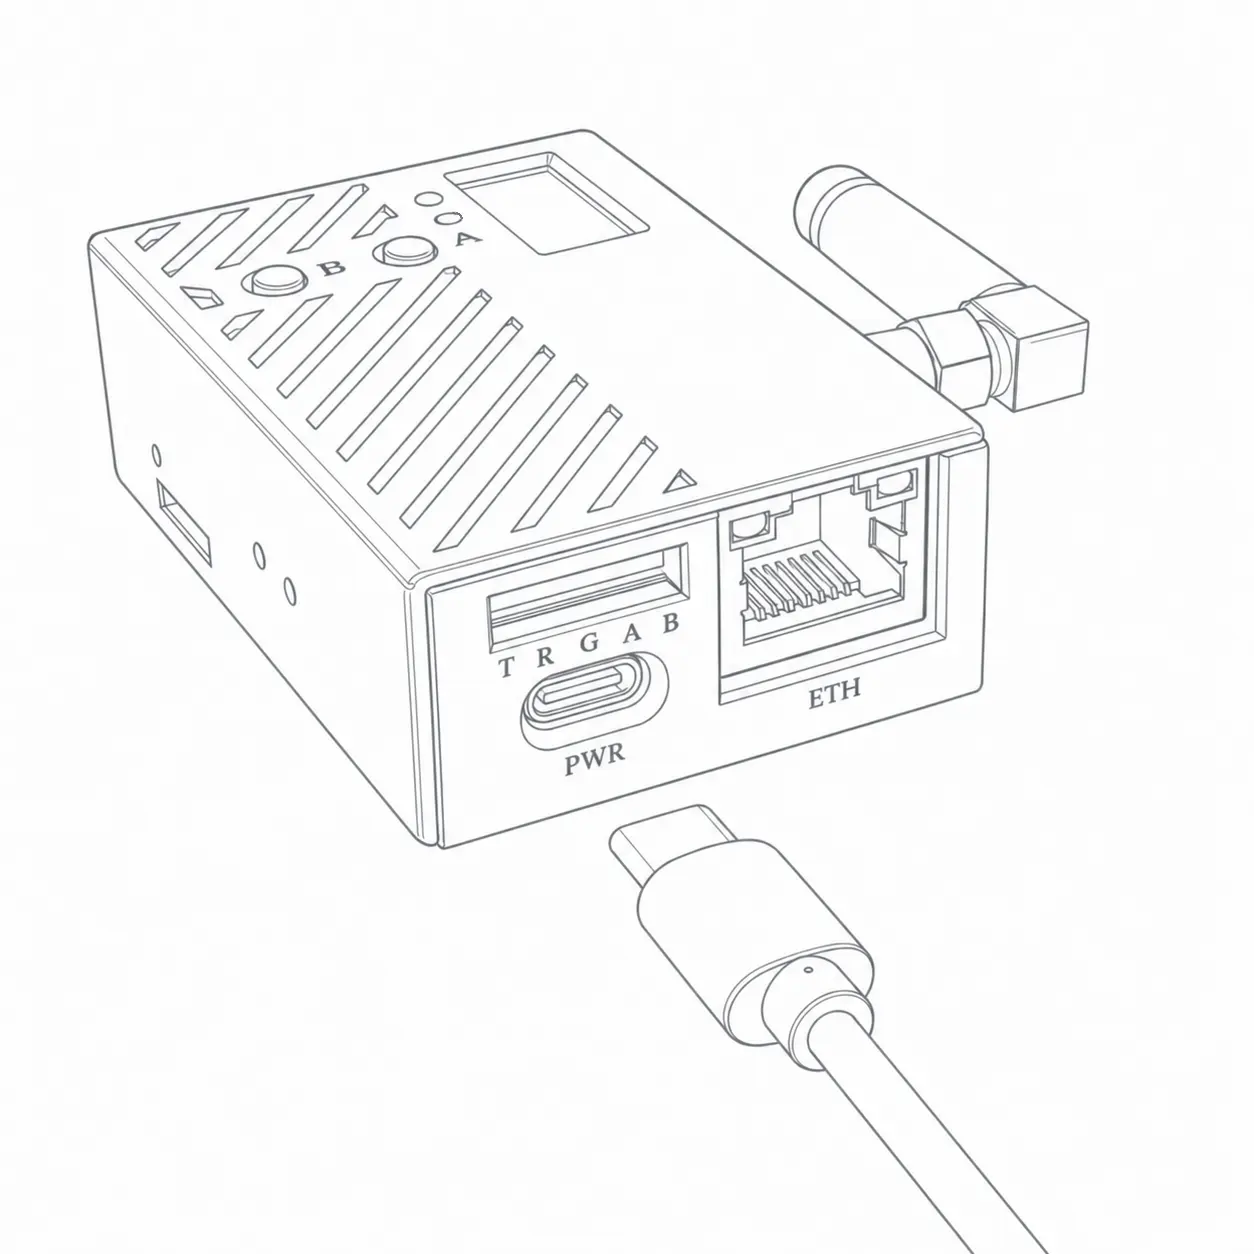
After connection:
- 🔴 Power LED [9] solid on
- After ~2 seconds, OLED display [14] shows the "Chutuotek" logo
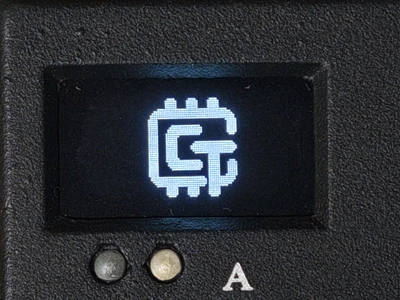
- After ~20 seconds (up to 30s for first boot is normal), OLED enters the device status screen
- 🟢 Status LED fast blink
- 🔴 Warning LED slow blink
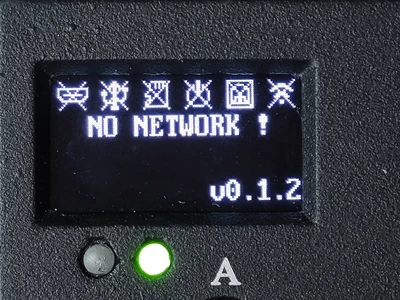
Troubleshooting: If the OLED shows nothing or 🔴 Power LED [9] doesn't light up, the power adapter may be underpowered. Use a 5V/1A or higher adapter.
No power adapter? Temporary workaround: flip the USB power switch [7] to I (no power adapter needed), skip this step, and go directly to connecting USB — the device will draw power from the target host. But if the target host shuts down, FlexKVM also loses power and cannot power it back on remotely. If you obtain a dedicated power adapter later, just plug it in to switch to independent power.
Connect USB
Take another USB Type-C cable (package item [3]) and connect FlexKVM's USB port [8] to a USB port on the target host.
Which USB port on the target host? Plug into an external USB port on the target host (same as you'd plug in a flash drive or keyboard) — no need to open the case. FlexKVM emulates a keyboard and mouse through this port. The ATX port [6] (used later for remote power control) is the one that connects to internal motherboard headers — not needed during quick start.
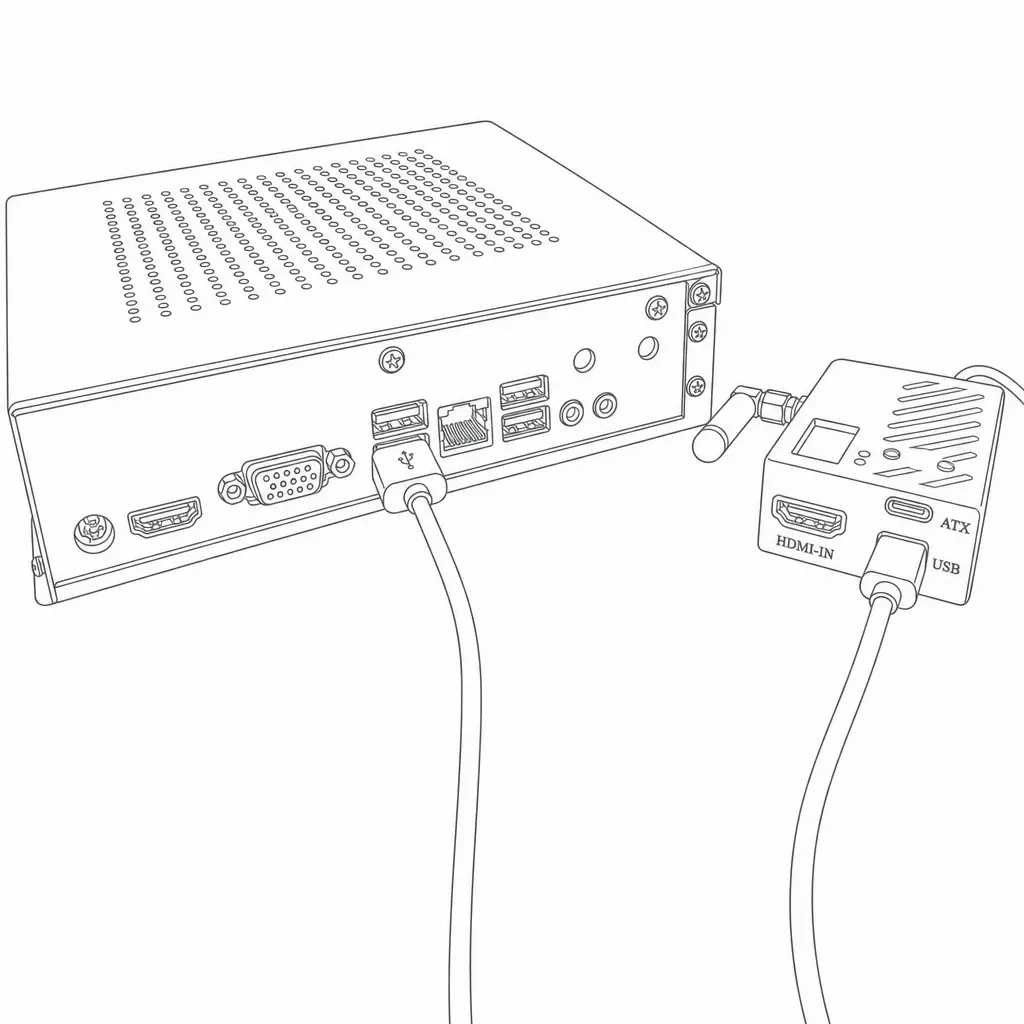
After connection:
- OLED status bar USB icon shows connected (the symbol disappears)
- 🟢 Status LED changes from fast blink to slow blink
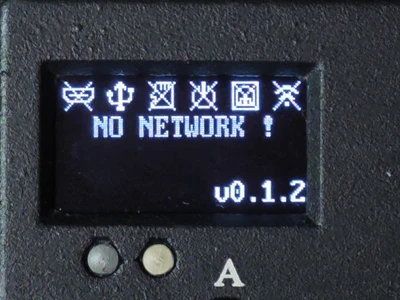
Troubleshooting: If 🟢 Status LED is still fast-blinking, check that the target host is powered on and that the USB cable supports data transfer (all three included USB Type-C cables support data; if using your own cable, make sure it's a data cable, not a charge-only cable — some charge-only cables cannot transmit keyboard/mouse signals).
Connect HDMI
Use the HDMI cable (package item [2]) to connect the target host's HDMI output to FlexKVM's HDMI input [5].
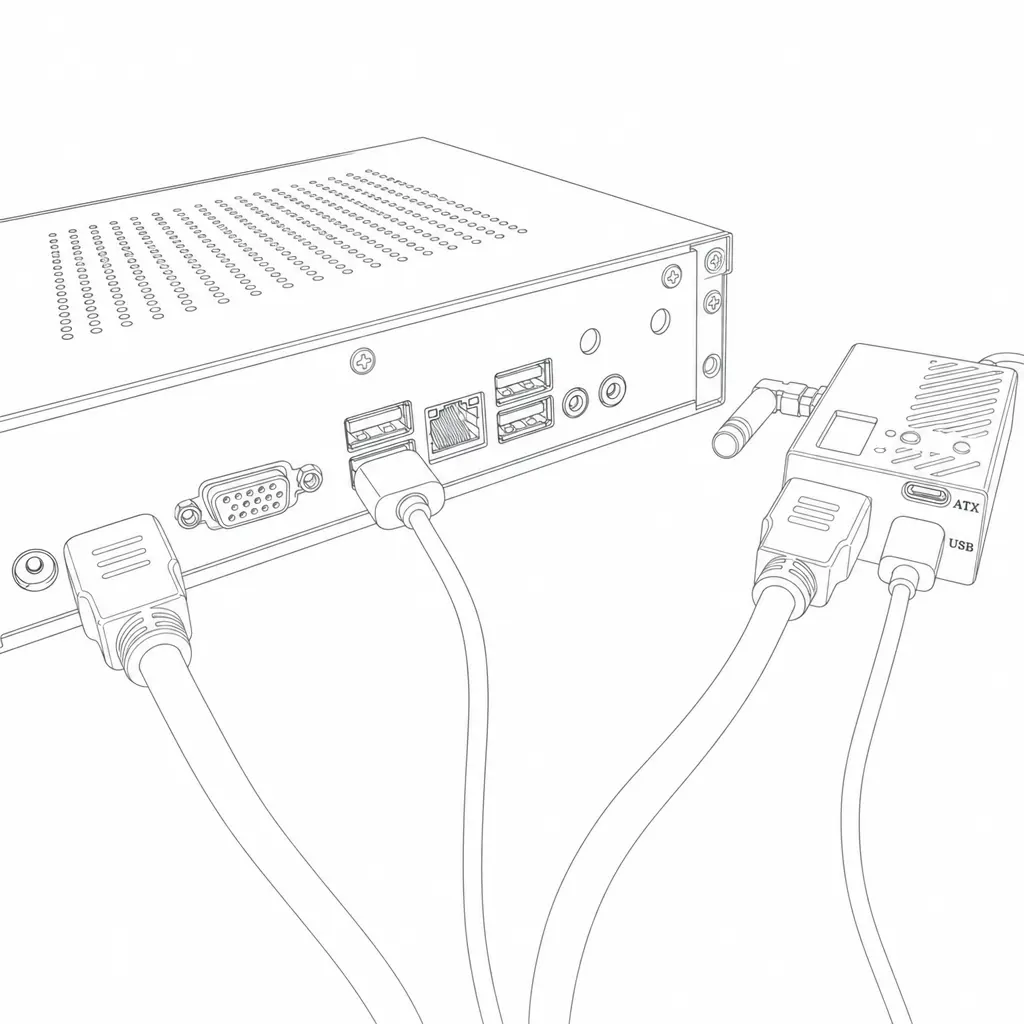
After connection:
- OLED status bar HDMI icon shows connected (the symbol disappears)
- 🟢 Status LED changes from slow blink to solid on
Verify Connections
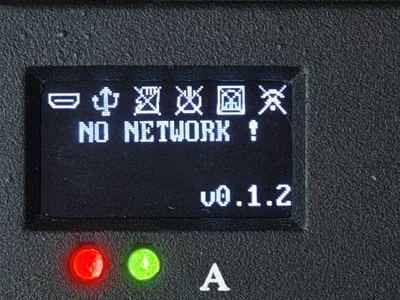
After all connections are complete, the device should be in this state:
- 🔴 Power LED [9] solid on
- 🟢 Status LED solid on
- 🔴 Warning LED slow blink
- OLED display [14] shows HDMI and USB connected
Network Configuration
When the device has no network, 🔴 Warning LED slow-blinks and the OLED second line shows "NO NETWORK !".
After network configuration:
- 🔴 Warning LED changes from slow blink to off
- OLED second line shows the IP address
Choose Connection Method
Determine whether a router is available:
| Environment | Condition | Options |
|---|---|---|
| With router | Router / switch available | Wired network, Hotspot provisioning |
| Without router | No router | Direct connect, AP hotspot |
With Router
FlexKVM and your control device connect to the same router and communicate over the LAN.
| Method | When to use | How | Difficulty |
|---|---|---|---|
| Wired network | Ethernet available | Plug cable into router | ⭐ |
| Hotspot provisioning | No Ethernet | Press Button A, configure WiFi | ⭐⭐ |
Without Router
FlexKVM provides its own network — connect your computer or phone directly.
| Method | When to use | How | Difficulty |
|---|---|---|---|
| Direct connect | PC has Ethernet port | Press Button B, cable to PC | ⭐ |
| AP hotspot | Phone / laptop | Press Button B, connect to FlexKVM WiFi | ⭐ |
Wired Network
Connect one end of the Ethernet cable to your router or switch, and the other end to FlexKVM's Ethernet port [16].
After connection:
- Ethernet port lights turn on and blink
- OLED status bar network icon activates and shows
waiting - Usually obtains an IP address within 5 seconds; OLED displays the IP (e.g.,
E192.168.1.100, prefixE= Ethernet; when accessing in a browser, enter only the numeric part, e.g.192.168.1.100— replace with the actual IP shown on OLED), 🔴 Warning LED turns off.
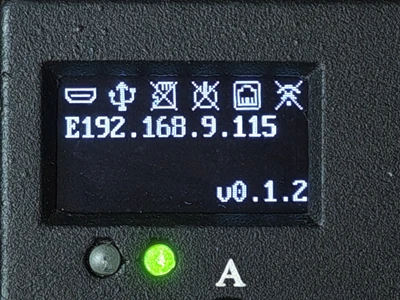
Troubleshooting — no IP after a long wait:
Ethernet light off → check both ends of the cable, try a different cable
Ethernet light on but not blinking → check the router port, try a different port
OLED shows
waitingfor over 20s → verify router DHCP is enabled, verify router IP pool is not exhaustedAll above OK but still no IP → try Hotspot Provisioning to connect via WiFi
No WiFi available → check router DHCP settings, or see Network Settings to configure a static IP
Hotspot Provisioning
Use this when no Ethernet cable is available and you need WiFi connectivity.
1. Enter Provisioning Mode
Long-press Button A [3] for 1–3 seconds. Release when the OLED shows the AP icon to enter hotspot provisioning mode.
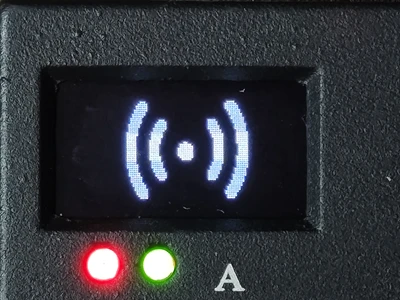
Less than 1s won't trigger; more than 3s returns to the home screen. If you miss the window, release and try again.
After releasing the button, the provisioning standby screen appears:
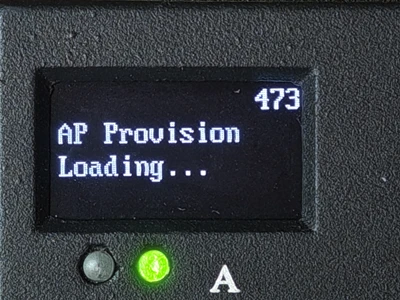
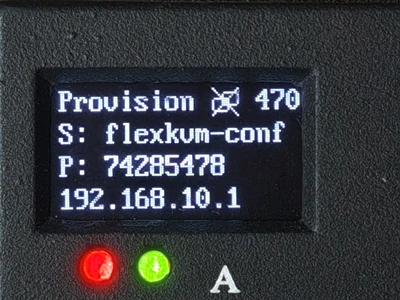
Wait about 12 seconds (the device is generating the WiFi hotspot — please be patient). The OLED will display the hotspot name, password, and IP address.
2. Connect to the Hotspot
Use your phone or computer to search for and connect to the hotspot shown on the OLED. Enter the displayed password (8 random digits).
After connecting:
- Phone: The browser captive portal should pop up automatically — tap to enter the provisioning page
- If it doesn't pop up: manually open a browser and go to
http://192.168.10.1 - Android users can also tap "Sign in to network" in the notification bar to open the portal
- Computer: Manually open a browser and go to
http://192.168.10.1
Your phone/computer will temporarily lose internet connectivity while connected to the FlexKVM hotspot. It will automatically restore after provisioning is complete.
Phone Demo
First, connect your phone to the FlexKVM hotspot.
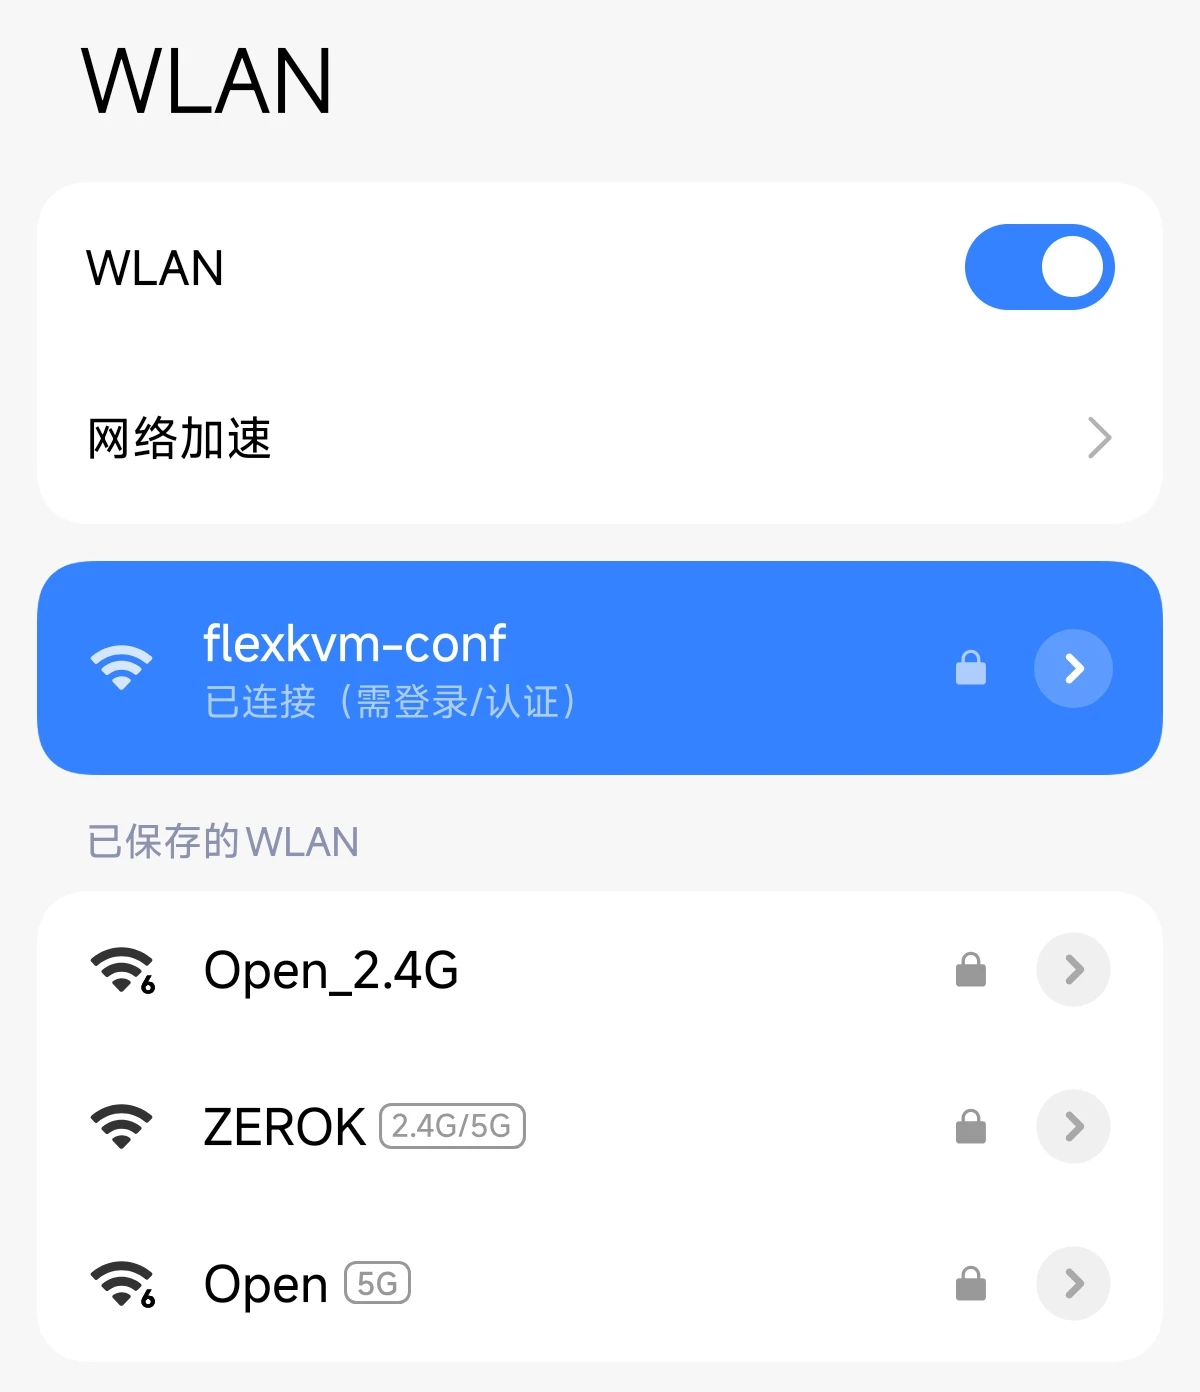
The phone will automatically open the browser captive portal. Tap "Sign in to Wi-Fi network" to enter the provisioning page.
If it doesn't pop up, manually go to
http://192.168.10.1.
3. Connect to WiFi
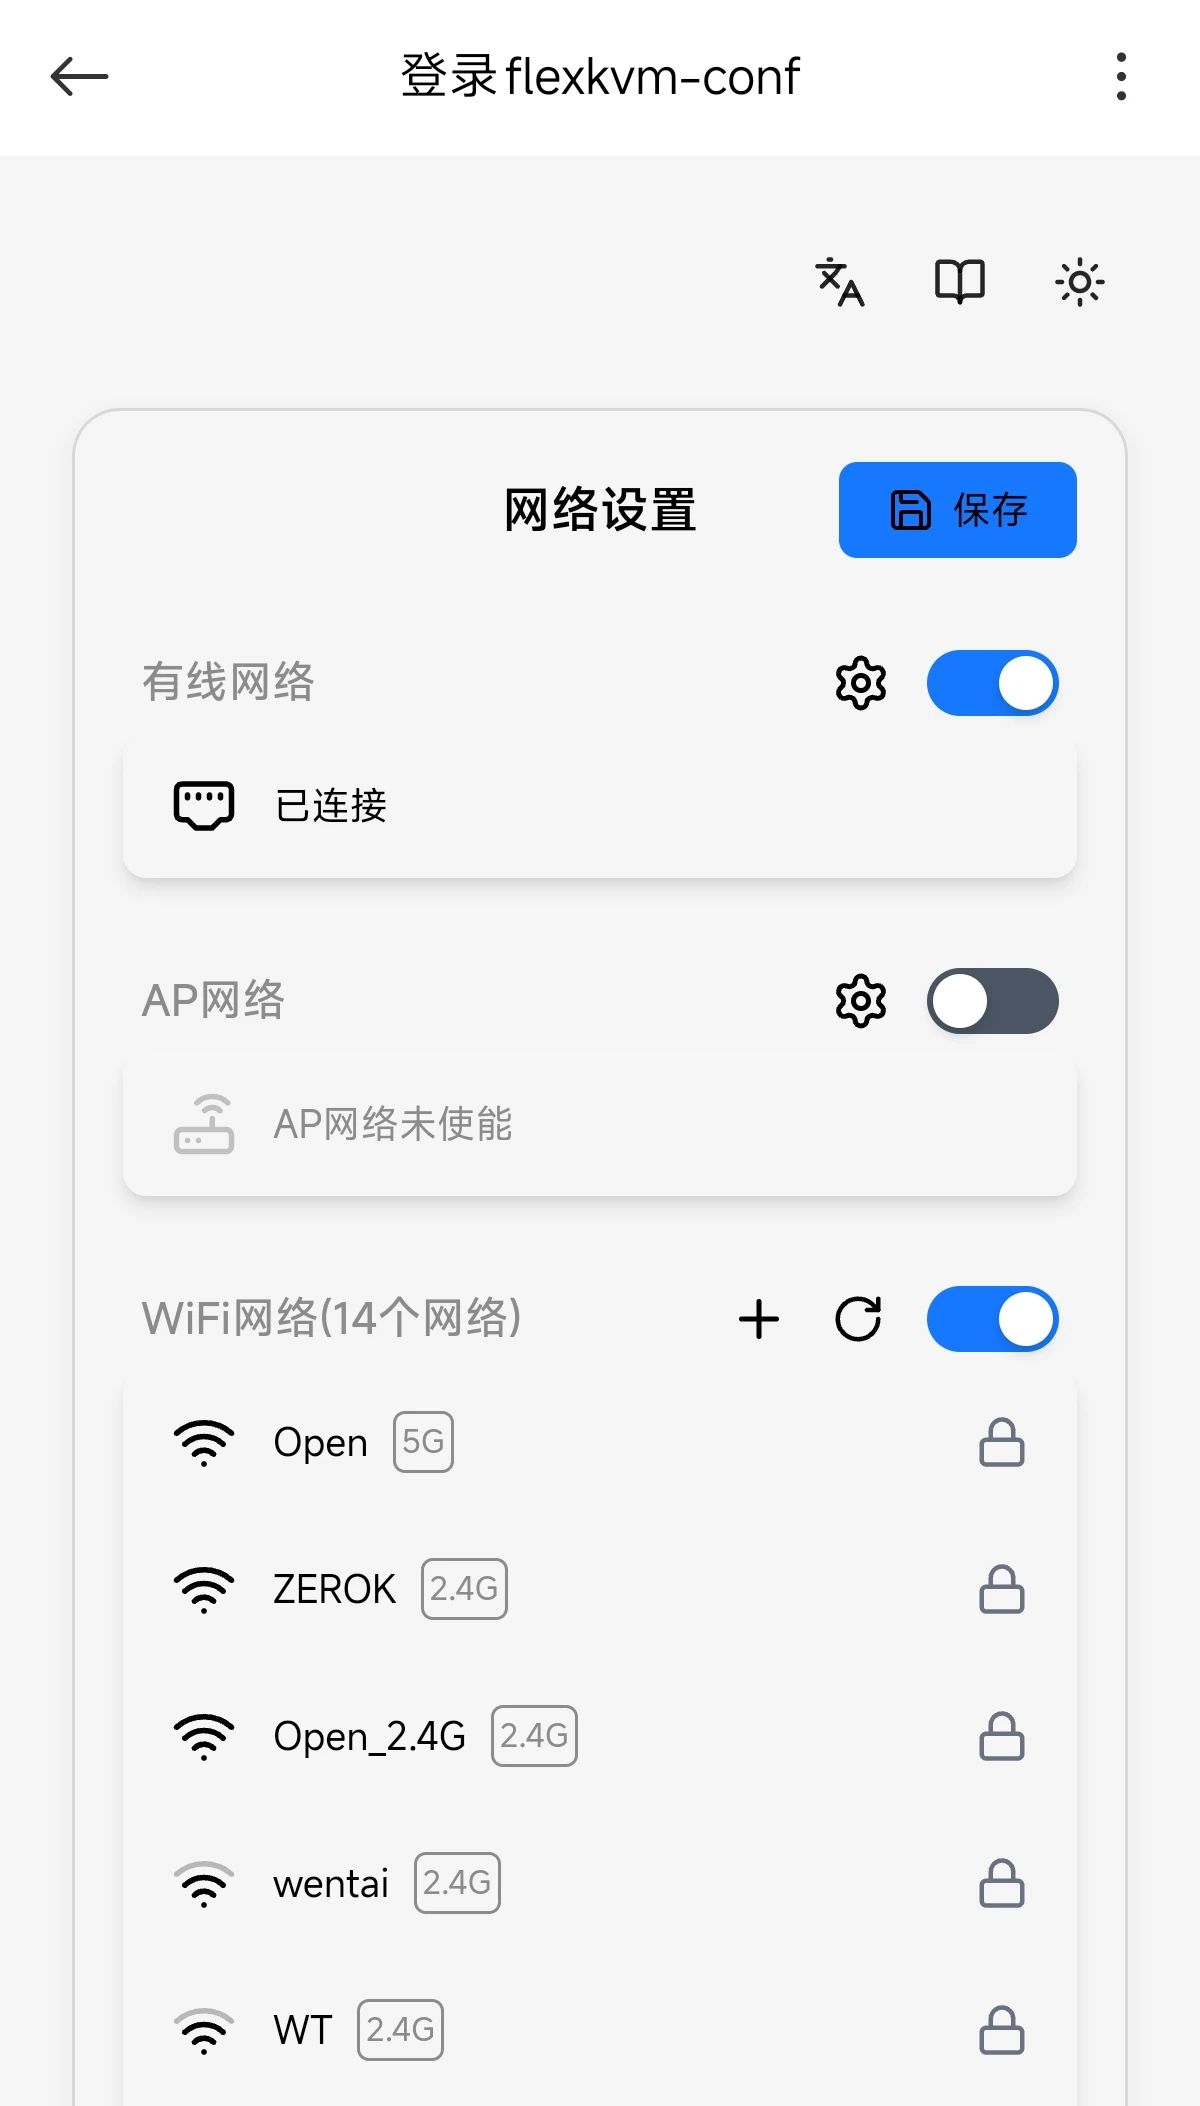
Once on the provisioning page, nearby WiFi networks are automatically scanned.
Tap the refresh button (🔄 icon) on the WiFi card to re-scan.
On the WiFi card:
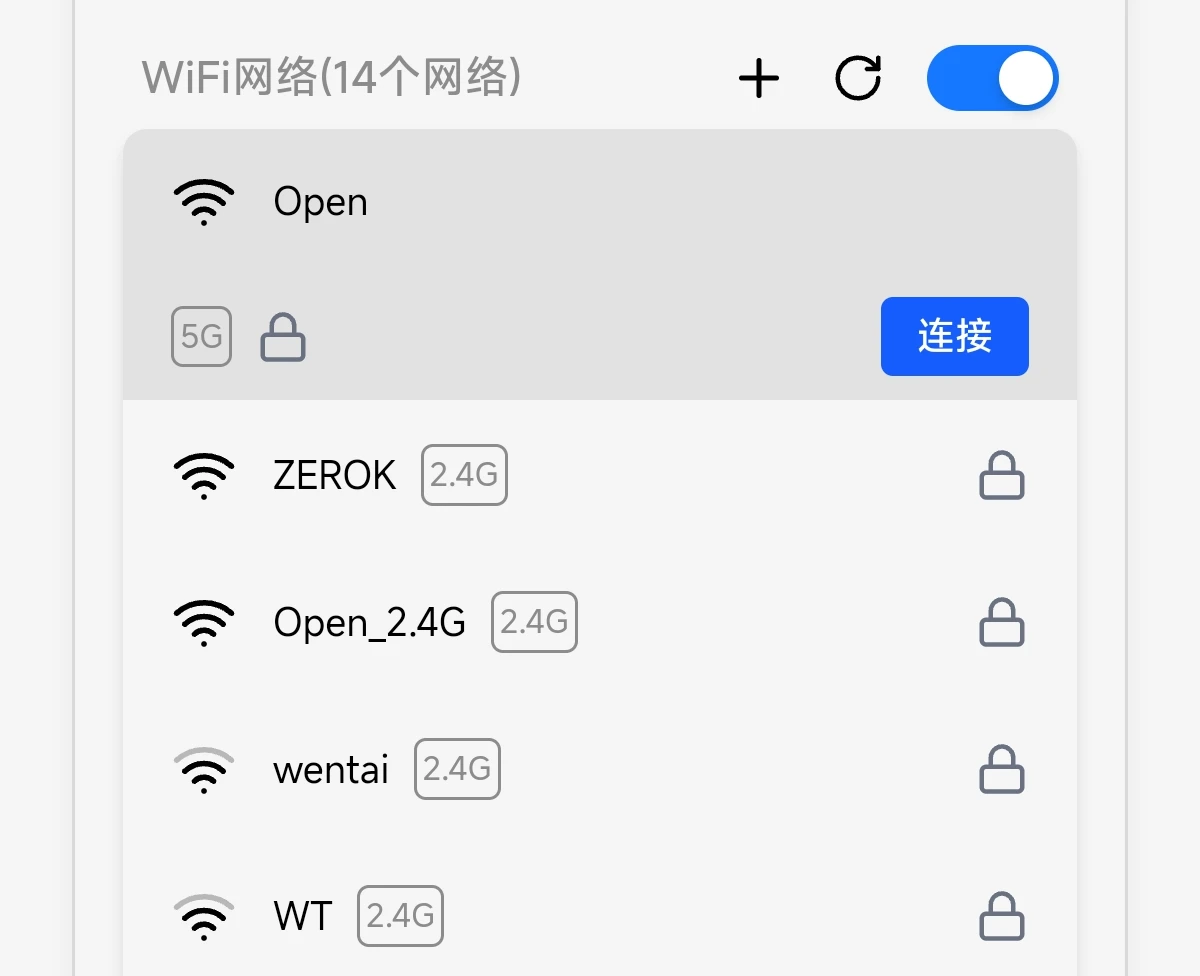
Tap the WiFi network you want to connect to, then tap Connect.
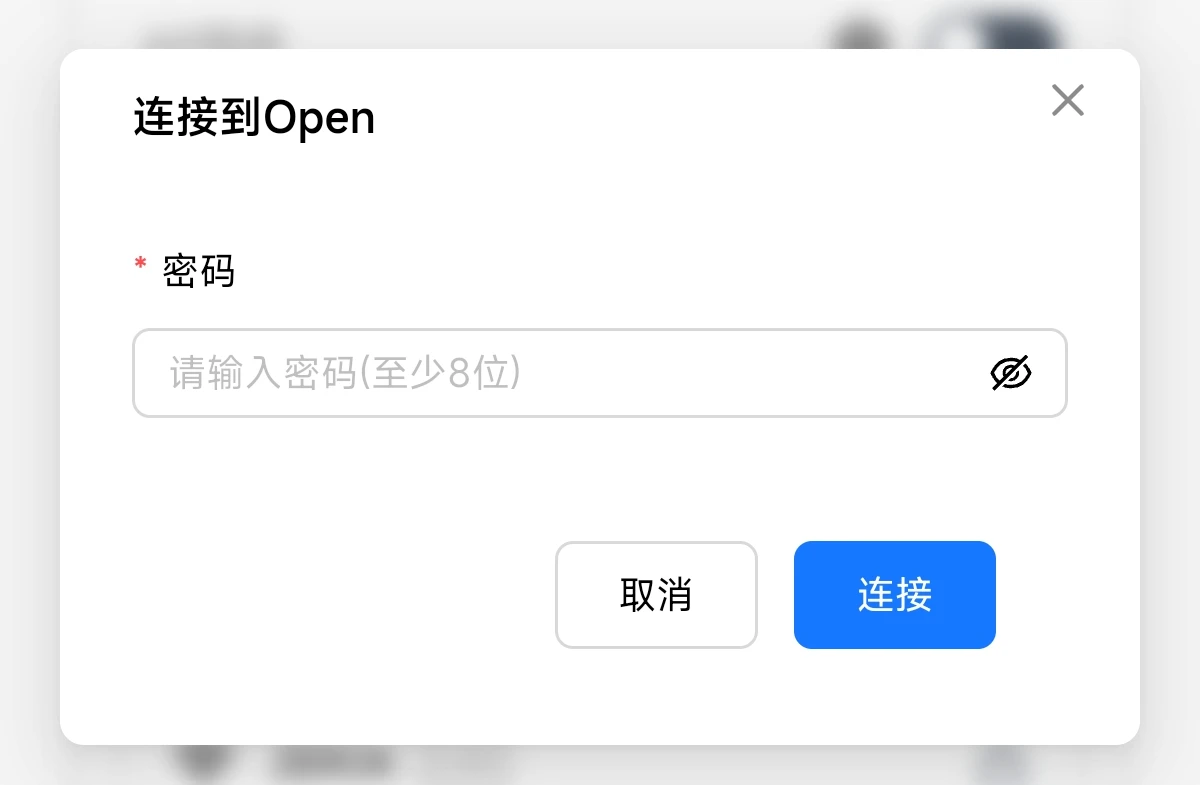
If the WiFi requires a password, enter it and tap Connect. (Open networks skip the password step.)
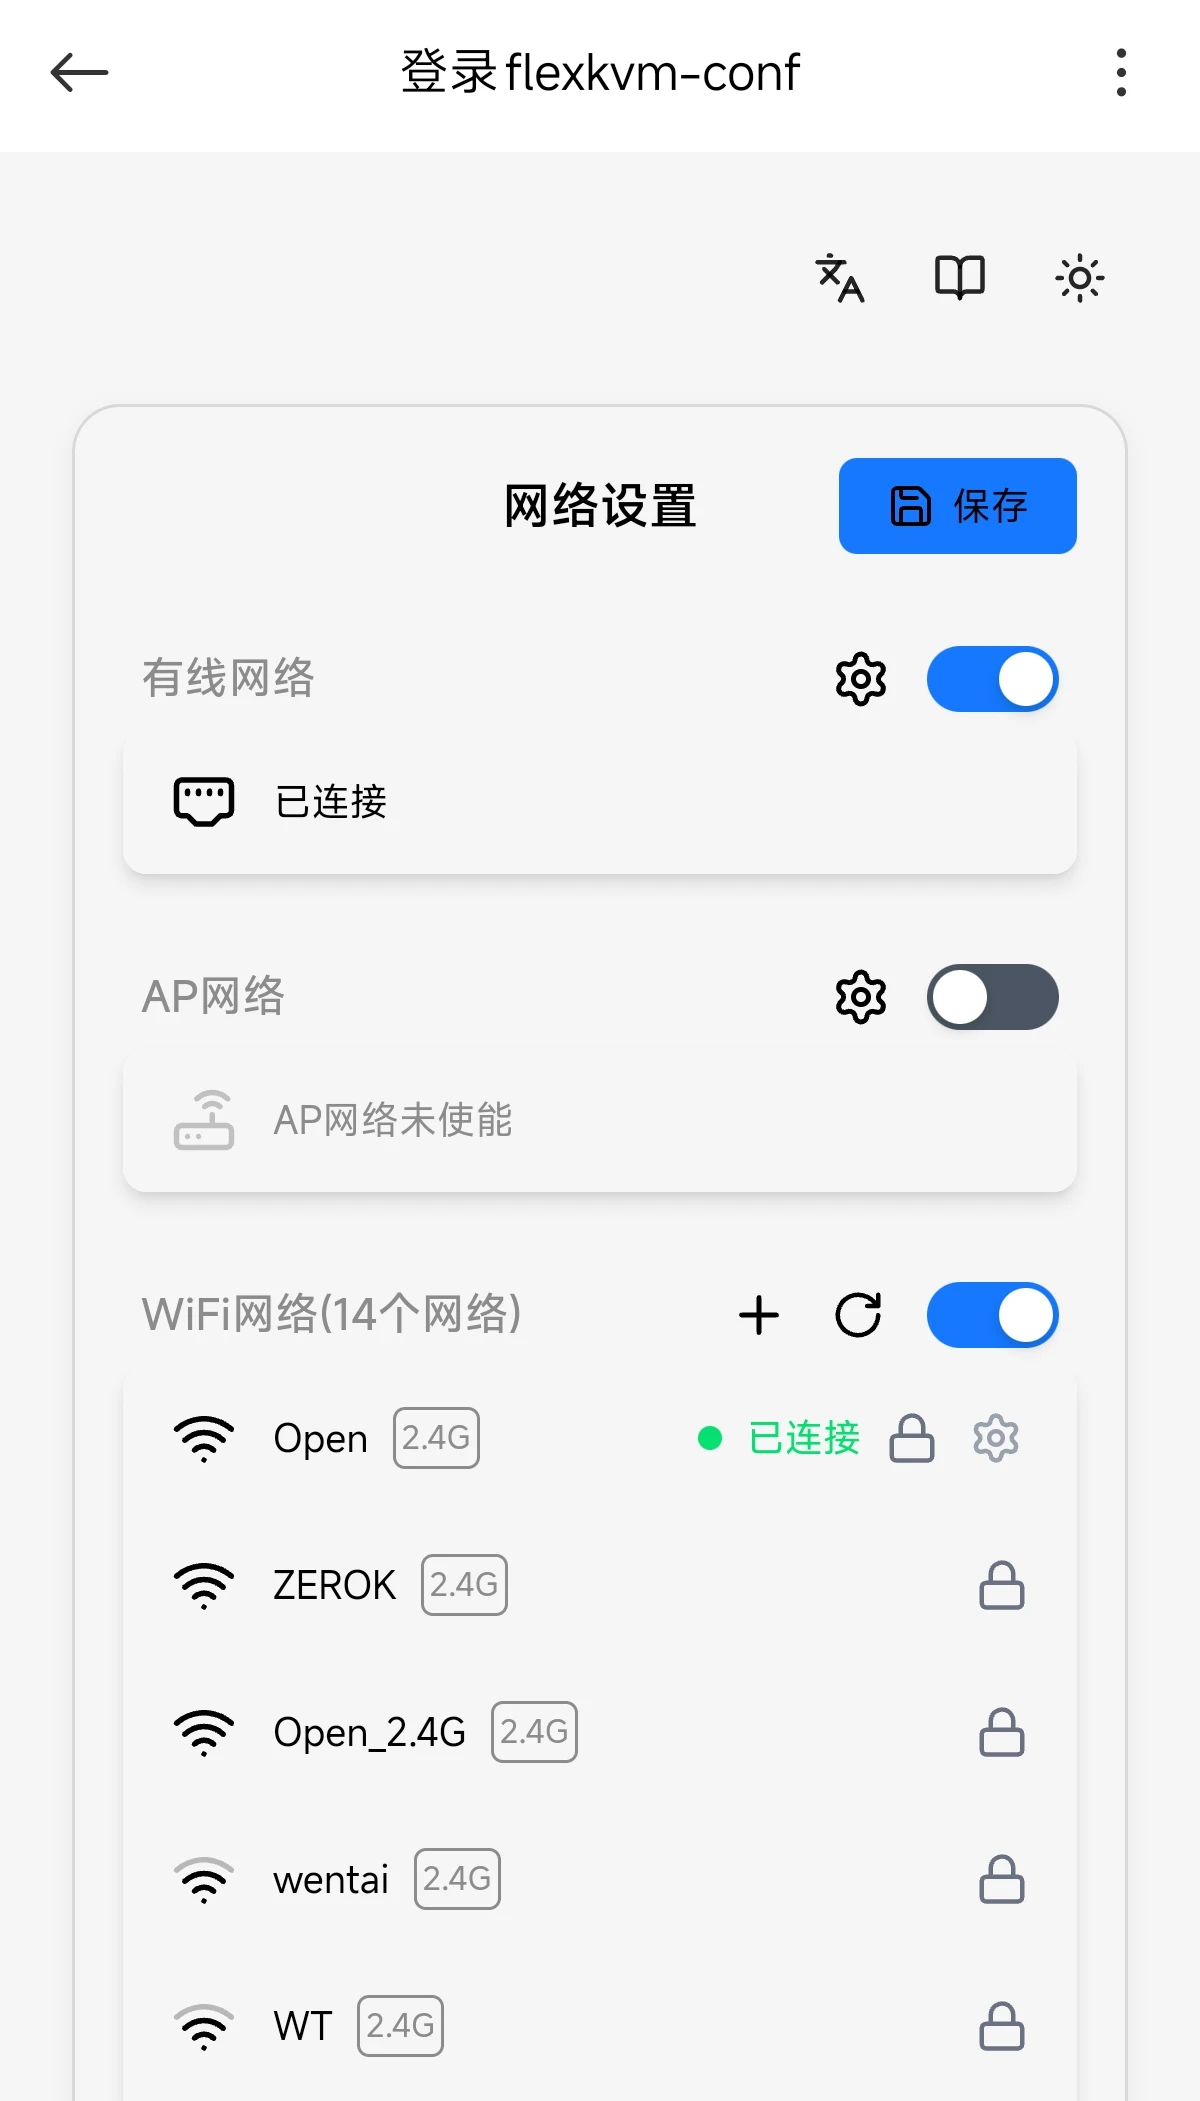
After connecting successfully, the WiFi card shows "Connected."
4. Exit Provisioning
Tap the Save button in the top-right corner. The device will automatically exit provisioning mode and restart networking.
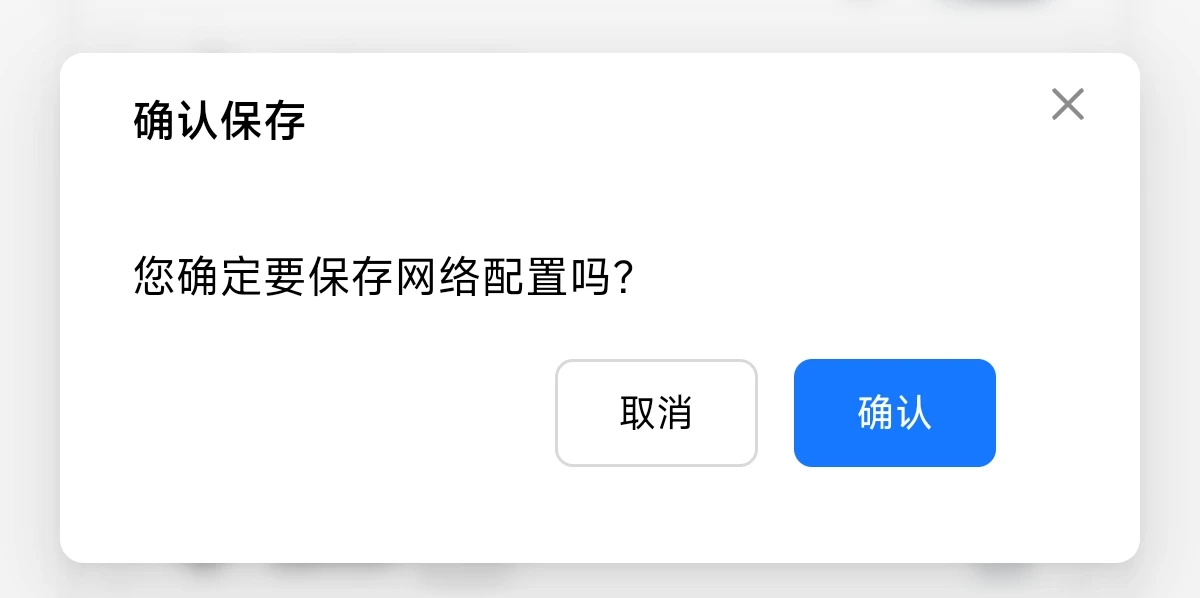
After confirming, the device exits provisioning mode and restarts its network.
You can now see the device has obtained an IP address, and the 🔴 Warning LED has turned off.
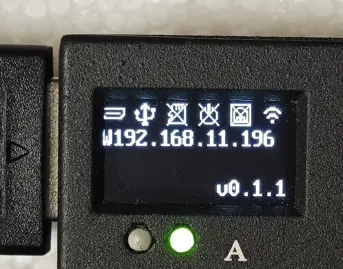
✅ Confirmation: OLED shows device IP address, 🔴 Warning LED off.
Direct Connect
Connect FlexKVM directly to your computer with a single Ethernet cable — no router needed.
1. Enable Direct Connect Mode
Long-press Button B [3] for 1–3 seconds and release when the OLED shows the ETH SERVER icon.
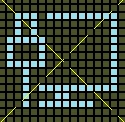
Less than 1s won't trigger; more than 3s moves to the next stage (AP hotspot toggle); beyond 5s returns to the home screen. If you miss the window, release and try again.
2. Connect to Your Computer
Plug one end of the Ethernet cable into FlexKVM's Ethernet port [16] and the other end into your computer's Ethernet port.
After connection:
- Your computer automatically gets a
192.168.100.xIP address (the computer's Ethernet must be set to DHCP — usually the default) - The OLED network icon switches to the direct connect icon, and the IP prefix changes to S (e.g.,
S192.168.100.1), S = Server - 🔴 Warning LED turns off
3. Access the Device
Open https://192.168.100.1 in your computer's browser.
Troubleshooting:
- Computer doesn't get an IP → check the cable connection, verify the Ethernet port is set to DHCP
- IP is not in 192.168.100.x → the computer may still be connected to another network (e.g., WiFi); turn off WiFi and keep only the wired connection
- Can ping but page won't open → clear browser cache, or try incognito mode
4. Exit Direct Connect Mode
Long-press Button B [3] for 1–3 seconds again and release when the OLED shows ETH CLIENT to restore normal Ethernet mode.
For detailed configuration (changing subnet, Web UI toggle, etc.), see Ethernet Direct Connect Mode.
AP Hotspot
FlexKVM creates its own WiFi hotspot — connect your phone or laptop directly, no router or Ethernet cable needed.
1. Enable the Hotspot
Long-press Button B [3] for 3–5 seconds and release when the OLED shows the hotspot icon.
Button B long-press has three stages: 1–3s first flashes
ETH SERVER/ETH CLIENT(direct connect toggle) — ignore it and keep holding. Release when the hotspot icon appears. Beyond 5s returns to the home screen.
2. Connect to the Hotspot
From your phone or computer:
- Search for and connect to the
FlexKVM-APWiFi hotspot - Enter password
12345678
After connection:
- The OLED shows the hotspot icon, and the IP prefix changes to A (e.g.,
A192.168.4.1), A = Access Point - 🔴 Warning LED turns off
3. Access the Device
Open https://192.168.4.1 in your browser.
While connected to the FlexKVM hotspot, your phone/computer will lose internet access. Remember to turn off the hotspot when done.
4. Exit Hotspot Mode
Long-press Button B [3] for 3–5 seconds again and release when the OLED shows the WiFi icon to turn off the hotspot and restore WiFi mode.
You can also disable it in Web UI → Settings → Network → Hotspot card.
For detailed configuration (SSID, password, band, etc.), see AP Hotspot Mode.
Access the Device
Browser Access
- Enter
https://<device-IP>in your browser's address bar (use the IP shown on the OLED, e.g.,https://192.168.1.100) -
Since the device uses a self-signed certificate, your browser will show a security warning. Follow the steps for your browser:
Browser Steps Chrome Click "Advanced" → "Proceed to (unsafe)" Edge Click "Advanced" → "Continue to this site (unsafe)" Firefox Click "Advanced" → "Accept the Risk and Continue" Safari Click "Show Details" → "Visit This Website" Mobile browsers Path differs from desktop; typically tap "Advanced" or "Details" to proceed
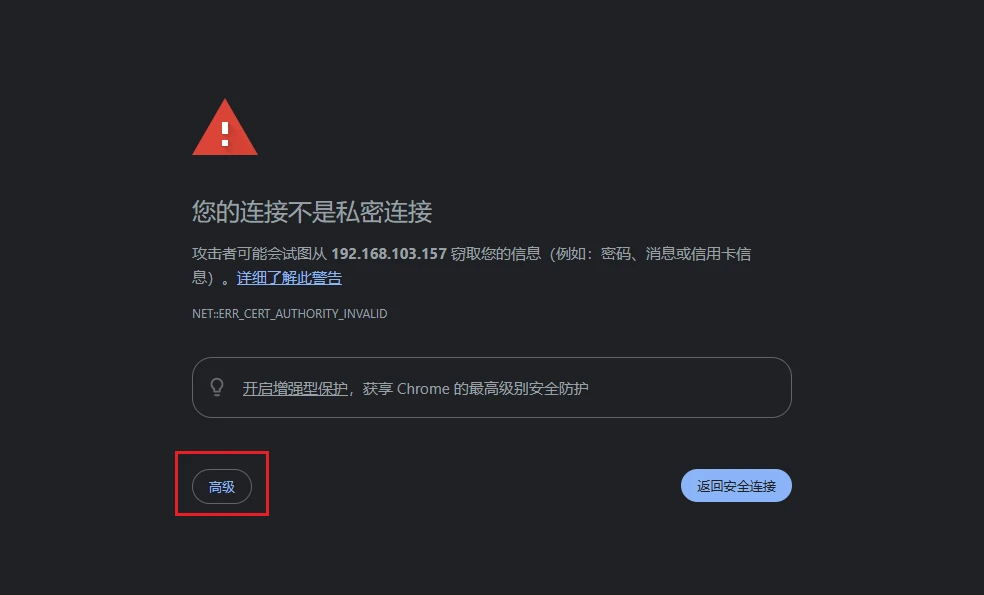
- Click the "Advanced" button at the bottom left
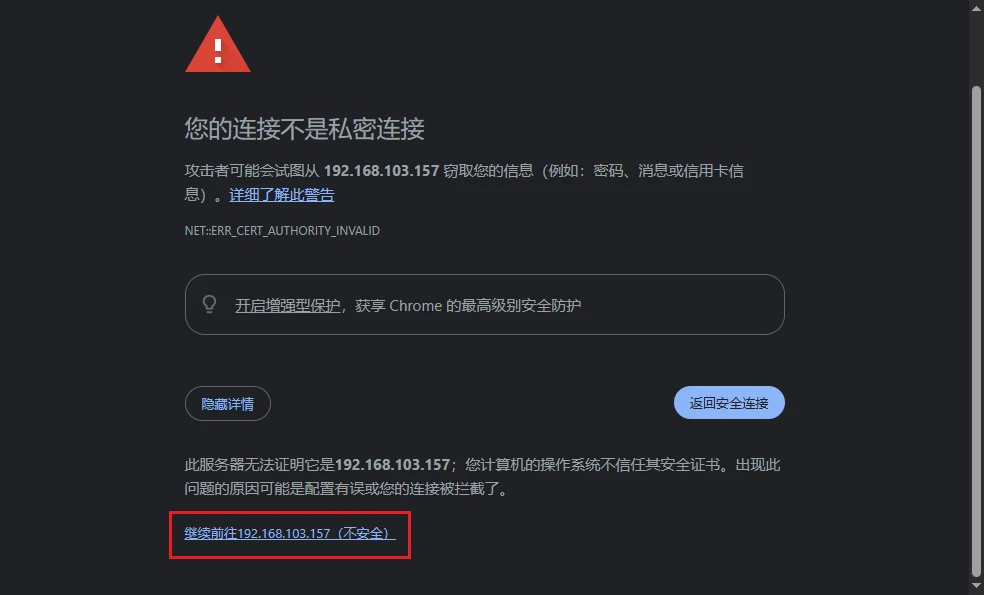
- Click "Proceed (unsafe)" or "Accept the Risk and Continue"
Can't open the page? If the browser shows "Unable to connect" or loads indefinitely:
Make sure your control device and FlexKVM are on the same router
Verify the IP address matches exactly what's shown on the OLED (don't forget the
https://prefix)Try pinging the IP from your control device to verify network reachability
If using hotspot provisioning, make sure your phone/computer is still connected to the FlexKVM hotspot and hasn't automatically switched back to another WiFi
Try a private/incognito browser window to rule out cache or HSTS issues
Create Your First Account
On first access, you need to create an admin account:
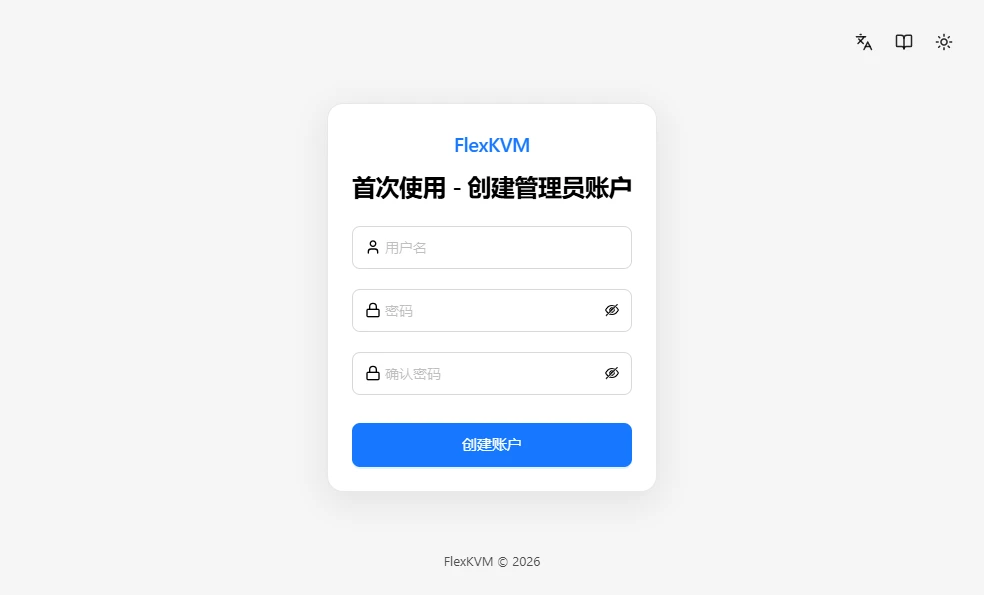
| Field | Requirements |
|---|---|
| Username | 4–32 characters, letters / numbers / underscores / dots / hyphens |
| Password | 8–32 characters, printable characters, no spaces |
| Confirm password | Re-enter the same password to confirm |
Fill in all fields and click "Create Account". The system will take you to the main interface.
Creation failed? Check: Does your username contain unsupported special characters? (Only letters, numbers, underscores, dots, and hyphens are allowed.) Do both password fields match? Is the network connection stable?
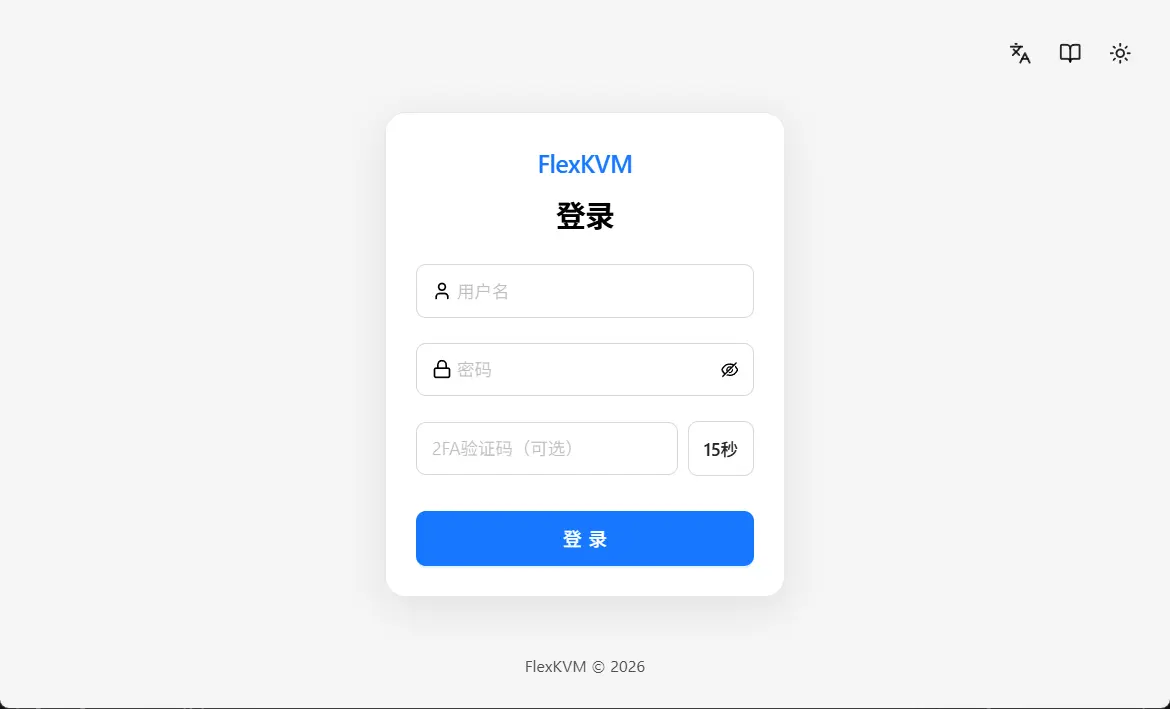
Log In to Existing Account
If you've already created an account, enter your username and password to log in.
If 2FA is enabled, you'll need to enter an additional verification code.
Main Interface
After logging in, you'll see the FlexKVM main interface. You can now start managing your target host remotely.
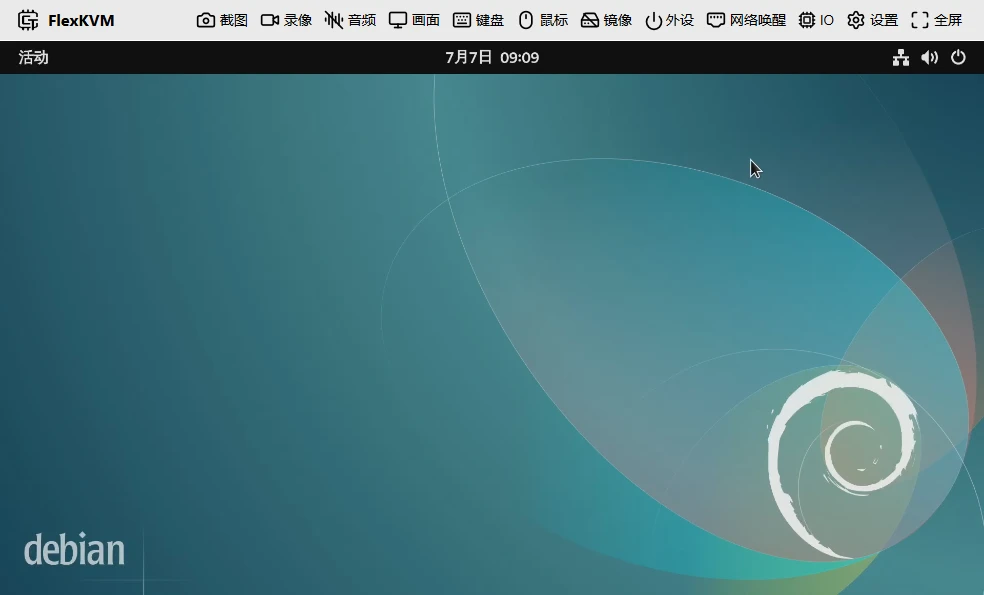
After prolonged power-off, the device RTC time may drift. When the device clock deviates over 60 seconds from the current time, a calibration prompt appears after login — click Confirm to calibrate the device time; the login credential refreshes automatically.
Daily Use
After initial setup, daily use is simple: enter https://<device-IP> in your browser and log in. As long as FlexKVM and the target host remain powered on and connected to the network, no reconfiguration is needed.
Next Steps
After completing basic setup, here's the recommended path:
- Get to know all interfaces → Interface Reference — understand the full capabilities before diving deeper
- Explore by scenario → Remote OS Install · Remote Access · Security Hardening
- Deep dive into features → User Guide
- Having trouble? → Help & Diagnostics
- Join the community → Community & Contact